
Histórias de CS
$77.99 O preço original era: $77.99.$24.99O preço atual é: $24.99.
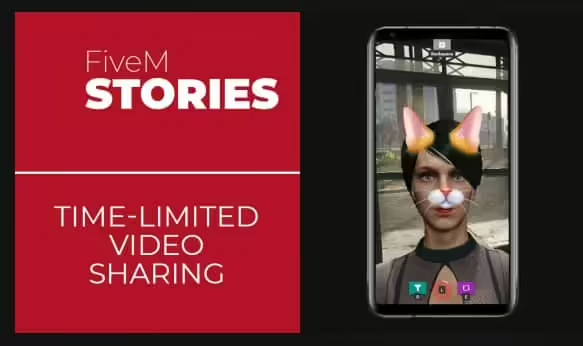
Looking to push your players’ social experience one step forward?
Give them the opportunity to express themselves via time-limited video sharing!
-
$ USD
-
€ EUR
-
£ GBP
-
$ AUD
-
R$ BRL
-
Download instantâneo
-
Garantia de satisfação
-
100% Código Aberto

The resource comes with an extensive configuration, events, exports and some client / server source files to allow you to customize it to your liking.
It is a standalone resource e works with any framework e can be hooked to any Lua NUI-based phone given you can develop the hook for it.
Out of the box we provide you hooks for gcphone, qb-phone, high-phone and qs-smartphone which cover those phones and also mainstream versions that are based on them like gksphone e xenknight. The hooks can be adjusted to your liking for element or style changes.
If you are a phone developer and a hook covers your phone but you don’t want it to, or if you want us to make a hook that does cover your phone, please contact us.
The stories are shown temporarily (default 24 hours) in the stories feed. This value can be changed in the configuration alongside with how long to keep the stories in storage (default 24 hours). The default maximum length of a story is 30 seconds (which results in ~5MB per maximum-length story video excluding the thumbnail). This value can be changed in the configuration and there is also a configurable rate limit in place to ensure your server does not run out of storage.
If you want to post the stories from the game to your Discord server for moderation and or logging purposes, you can download the companion resource cs-stories-dw to do so. Check its config.js for more information and make sure to use it in accordance with Discord’s webhook policies.
A hosting server is included that is mandatory, with yarn resource required as a dependency. The hosting server stores the stories’ videos, thumbnails and some metadata, therefore it imposes network, bandwidth and storage requirements as well as requiring an extra TCP port to be open. Besides the integrated solution, the hosting server is also offered as an external node.js application to be hosted in the same or in a different machine allowing you to offset the network, bandwidth or and storage requirements.
If your phone is of versão_fx “cerulean”, then you will have to route the stories’ hosting server via HTTPS. You can do this by using a domain and Cloudflare. Alternatively, you can change the versão_fx of your phone to “bodacious”.
Características
- Short and temporary video stories featuring uploader in-game location and uploader in-game name.
- Ability to self-delete uploaded stories and integration for authorized players to delete anyone’s stories.
- Simplistic stories feed with full mouse and keyboard navigation apoiar.
- Ability to switch between the back and the front camera.
- Dynamic adjustment to center properly in various resolutions.
- Plug-and-play integration with phones that we offer out-of-the-box hooks for.
- Color filters (grayscale, sepia, invert, saturate, etc.).
- Image filters with real-time player ped face-tracking (dog, cat, etc.).
- Optimized for a balance between quality and performance.
- An experimental camera mode that allows the player to move while recording a story.
- A wide array of events and exports to check and control the resource.
Instruções de instalação
- Make sure you have yarn em seu recursos pasta.
- Download cs-stories and place it in your recursos pasta.
- Adicionar ensure cs-stories to your server’s configuration file before ensuring your phone.
- Edit your phone’s __recurso.lua ou fxmanifest.lua file and add ‘@cs-stories/client/hooks/core.lua’ as the last client script and ‘@cs-stories/server/hooks/core.lua’ as the last server script.
- Edit your phone’s NUI file (usually índice.html) and add <script type=”text/javascript” src=”nui://cs-stories/client/hooks/core.js”></script> right before </body>.
- Check the configuração.lua file inside cs-stories for further configuration and read through all options and their comments and adjust them to your setup and preferences.
- Given you’re using the internal solution, open the required port (by default 35540; incoming – inbound) in your firewall on TCP protocol.
- Run the command refresh and the command ensure cs-stories.
- If your phone uses an animation loop you may need to edit it (usually found in an animation.lua file) and add a not CS_STORIES.ACTIVE check before playing an animation to ensure an animation glitch does not occur when the video call camera is opened.
- Ensure your phone.
External Hosting Server
If you choose not to use the integrated proxy server then download the external node.js application and install it with npm install, read through all options and their comments inside its config.js file as they are very important for the setup process, adjust them to your setup and preferences and then run it with node, then make sure to add the external server’s IP address in the sv_proxyIPRanges property in your server’s configuration file. You can use pm2 to make sure it runs all the time.
Informações importantes
- The player will be asked for microphone approval, if they deny, their voice will not be recorded in stories. If they mistakenly deny, they will need to reset it (for now this is done by deleting the file “%AppData%\CitizenFX\media_access.json”).
- When recording a story, the voice is recorded by the player’s system default microphone. This cannot be changed.
- Only the voice of the player recording is recorded. This cannot be changed.
- The recording determinates whether the player is talking using the built-in native. If you are using an external VoIP such as TokoVoip or similar you will need to edit the hook to correctly determine when the player is talking.
- A player recording a story cannot move. This is default GTA:V camera behavior. You can try using experimental camera mode which allows the player to move, however it might not be as smooth as the native one.
- Video render lag / freezes may be caused in very high resolutions or in very low-spec systems.
- The story recording works using game capture (similar to screenshot-basic), whatever it’s on the game is recorded. That includes visual settings / mods, game drawings / UIs but not NUIs.
- If your server is running behind a reverse proxy that you have no control over and cannot handle an extra TCP port as required by the resource, your only option may be to externally host the stories’ hosting server in a different machine (for example a cheap VPS with enough bandwidth / network / storage to work within your own limits) that can handle the requirements.
- When a story is being uploaded or viewed by a player, like any other video-upload service, the player’s upload / download speed is being used and network / bandwidth is consumed on the hosting server as well.
- If your hosting server host does not offer unlimited bandwidth or has a low network limit you are advised to periodically check your usage statistics if you have a lot of players uploading and viewing stories. Also make sure to check your storage if you have a ton of stories being uploaded and are not being cleaned up.
- The resource is using FiveM’s KV storage to store the metadata of the saved stories, if you are using a shared multi-server setup this may cause an issue and you may want to set sv_kvsName console variable to something unique for your server.
- There are checks in place to ensure that the recorded video and the in-game location are legitimate and are coming from the game itself, however since the client sends them, they cannot be fully trusted.
- The stories are deleted (as per configuration) when the resource starts, so stories storage cleanup depends on how often you restart your server or the resource.
Frequent Issues & Questions
Q: I can use the stories app but when I try to view or upload a story, an error happens, why?
A: If your phone is of versão_fx “cerulean”, then you will have to route the stories’ hosting server via HTTPS. You can do this by using a domain and Cloudflare. Alternatively, you can change the versão_fx of your phone to “bodacious”. If this was not your issue then the problem usually lies in TCP blocking, complex network setup or anti-DDoS protection. Try a different port, preferably in a high range to see if that will resolve your issue and make sure that port is open for TCP protocol. If that doesn’t work then your best solution here may be to externally host the stories’ hosting server in a different machine (for example a cheap VPS with enough bandwidth / network / storage to work within your own limits) that can handle the requirements.
Q: I’ve done everything but I cannot see a stories app button, what’s wrong?
A: Not seeing a stories app button is possibly related to the hook you are using. First make sure you are using the correct hook for the phone you have. Then make sure your phone events and DOM elements are properly reflected in the hook and that the hook is configured properly. Also note that some hooks add the stories app in the phone’s app store rather than immediately adding it as an app.
Q: My yarn is repeatedly trying to install the resource, what do I do?
A: This seems to be a current bug in the yarn resource related to package.json and the server’s time zone related to the time zone of the system you copied the resource from. Edit package.json and just add or remove a space character, save it and the issue will go away.
Apenas clientes logados que compraram este produto podem deixar uma avaliação.
Como instalar recursos
Instalar mods no FiveM permite que você personalize seu servidor com ativos exclusivos, scripts, MLOs e outros aprimoramentos. Aqui está um guia claro e detalhado sobre como instalar mods no seu servidor FiveM.
Etapa 1: Baixe o Mod desejado
Encontre um Mod: Comece navegando pelos sites que oferecem mods FiveM, como fivem-mods.net, GTA5-Mods.com, ou fóruns baseados na comunidade e servidores Discord. Você também pode baixar mods de repositórios como GitHub ou de sites pessoais de desenvolvedores de scripts.
Verificar compatibilidade: Certifique-se de que o mod que você está baixando é compatível com a versão do FiveM que você está executando (especialmente se você estiver usando frameworks específicos como QBCore ou ESX).
Baixar arquivos: Baixe os arquivos mod, geralmente compactados em um
.zipou.rarformato de arquivo. Esses arquivos conterão os recursos necessários para a instalação.
Etapa 2: Prepare seu servidor
Acesse os arquivos do seu servidor: Entre no gerenciador de arquivos do seu servidor FiveM. Isso pode ser feito por meio de um cliente FTP como o FileZilla ou pelo painel de controle fornecido pelo seu provedor de hospedagem.
Criar um backup: Antes de fazer qualquer alteração, é essencial fazer backup dos arquivos do seu servidor. Isso garante que você possa restaurar seu servidor caso algo dê errado.
Localize a pasta de recursos: Uma vez dentro dos arquivos do seu servidor, localize o recursos pasta. É aqui que todos os mods e scripts são instalados.
Etapa 3: Instale o Mod
Extrair os arquivos: Se o mod estiver em um arquivo compactado, extraia o conteúdo para uma pasta no seu computador local.
Carregar os arquivos do mod:
- Use seu cliente FTP ou gerenciador de arquivos para carregar a pasta extraída no recursos pasta do seu servidor.
- Certifique-se de que o nome da pasta seja descritivo, pois você fará referência a ela na configuração do servidor.
Configurar o servidor para carregar o mod:
- Abra o seu servidor servidor.cfg arquivo (encontrado no diretório principal do seu servidor).
- Adicione uma linha para garantir que o servidor carregue o mod. Normalmente, isso estará no formato de:css
garantir [nome_mod] - Por exemplo, se você adicionou um mod chamado
meu_carro_mod, você acrescentaria:rubigarantir meu_carro_mod
Etapa 4: Configurar dependências (se houver)
Alguns mods podem ter dependências, como bibliotecas, frameworks ou recursos específicos que precisam ser instalados separadamente. Sempre verifique a documentação do mod para quaisquer requisitos desse tipo.
Instalar dependências:Se o mod exigir recursos adicionais, baixe e instale-os no mesmo recursos pasta, seguindo o mesmo processo descrito na Etapa 3.
Carregar dependências: Adicione quaisquer dependências necessárias ao seu
servidor.cfgarquivo exatamente como você fez para o mod principal.
Etapa 5: Reinicie o servidor
- Reinicie o servidor: Depois que o mod e suas dependências forem carregados e configurados, reinicie seu servidor.
- Você pode usar o Reiniciar no seu painel de controle ou reinicie-o manualmente por meio de um cliente FTP ou comando de terminal.
- Verifique o console: Após a reinicialização, monitore o console do servidor para quaisquer mensagens de erro. Se você vir quaisquer problemas relacionados ao mod, verifique a documentação do mod ou solucione problemas com base na mensagem de erro.
Etapa 6: Teste o Mod no Jogo
Junte-se ao seu servidor: Abra o FiveM e conecte-se ao seu servidor para testar o mod.
Verificar se há problemas: Teste se o mod funciona como esperado. Certifique-se de que os novos recursos, veículos ou scripts estejam carregando corretamente.
Etapa 7: Solucionar problemas (se necessário)
Se o mod não estiver funcionando como esperado, talvez seja necessário solucionar o problema:
- Verifique os caminhos dos arquivos: Certifique-se de que todos os arquivos estejam nas pastas e caminhos corretos.
- Registros de revisão: Verifique os logs do servidor para verificar se há erros ou conflitos.
- Atualizar Dependências: Certifique-se de que todas as dependências necessárias estejam instaladas corretamente e atualizadas.
- Compatibilidade com Mods: Verifique se o mod é compatível com a versão do FiveM e outros mods que você está usando.
Considerações finais
Instalar mods no seu servidor FiveM é uma ótima maneira de melhorar a jogabilidade, oferecer conteúdo exclusivo aos jogadores e fazer seu servidor se destacar. Lembre-se sempre de fazer backup do seu servidor antes de fazer qualquer alteração e esteja atento à compatibilidade de mods para evitar conflitos.
Seguindo os passos descritos acima, você pode facilmente instalar e gerenciar mods para enriquecer sua experiência no servidor FiveM.
Mods que estenderão o Roleplay
- Garantia de devolução de dinheiro:Se você não estiver satisfeito, oferecemos uma política de reembolso sem perguntas.
- Conteúdo exclusivo: Nossos mods e scripts são criados profissionalmente e exclusivos para nossa plataforma.
- Confiável pela Comunidade: Junte-se a milhares de proprietários de servidores FiveM que confiam em nós para obter recursos de qualidade.
- Design de alta qualidade: Construído com práticas de codificação otimizadas para desempenho de alto nível.
- Integração perfeita: Instale e execute facilmente em qualquer servidor FiveM sem problemas de compatibilidade.
- Opções personalizáveis: Ajuste as configurações e os recursos para adaptá-los ao estilo exclusivo do seu servidor.
- Desempenho otimizado: Testado para garantir uso mínimo de recursos e máxima eficiência.
- Atualizações vitalícias: Fique por dentro com atualizações e melhorias contínuas incluídas sem custo extra.


1 avaliação para CS Stories
Não há avaliações ainda.