FiveM Military
Military Base Ursprünglicher Preis war: $40.00Aktueller Preis ist: $20.00.
Back to products
Pyat Hood Ursprünglicher Preis war: $54.99Aktueller Preis ist: $19.99.

Body Damages V2 [ ESX / QBCore / STANDALONE ]

Ursprünglicher Preis war: $28.99Aktueller Preis ist: $18.99.

(6 customer reviews)

This is the second version of my Body Damages script, with new improvements, new graphical interface, including the old one and the classic version which was not released in the previous version and some more features.

Well, this script was developed for the Roleplay server to have a greater immersion with doctors.

However, this script can be used on any type of server, for example, ZUMBI servers, be creative.

It shows the player, the damage he has taken, what damage he has taken, if he is injured, shot, cuts, punches, drowning, run over, explosion, fall and much more.

$ USD
  • $ USD
  • € EUR
  • £ GBP
  • $ AUD
  • R$ BRL
  • CHF CHF
  • ¥ JPY
  • Instant Download
  • Satisfaction Guarantee
  • 100% Open Source
  • Works out-of-the-box
Beschreibung

Graphic interface:

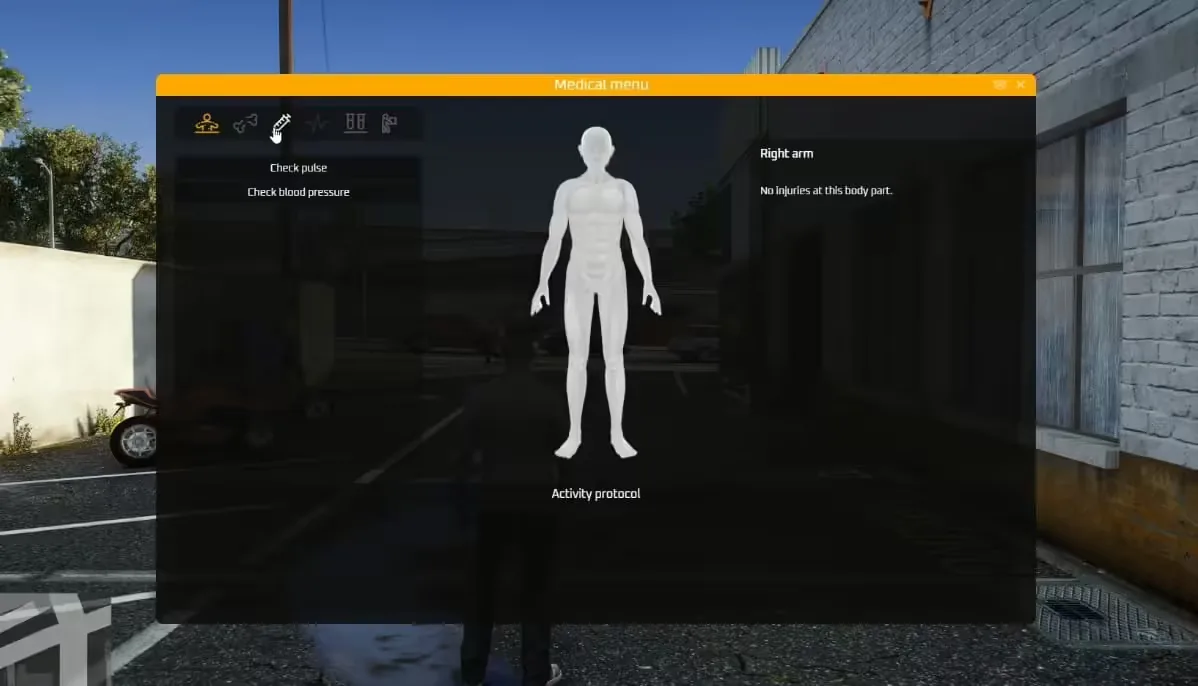
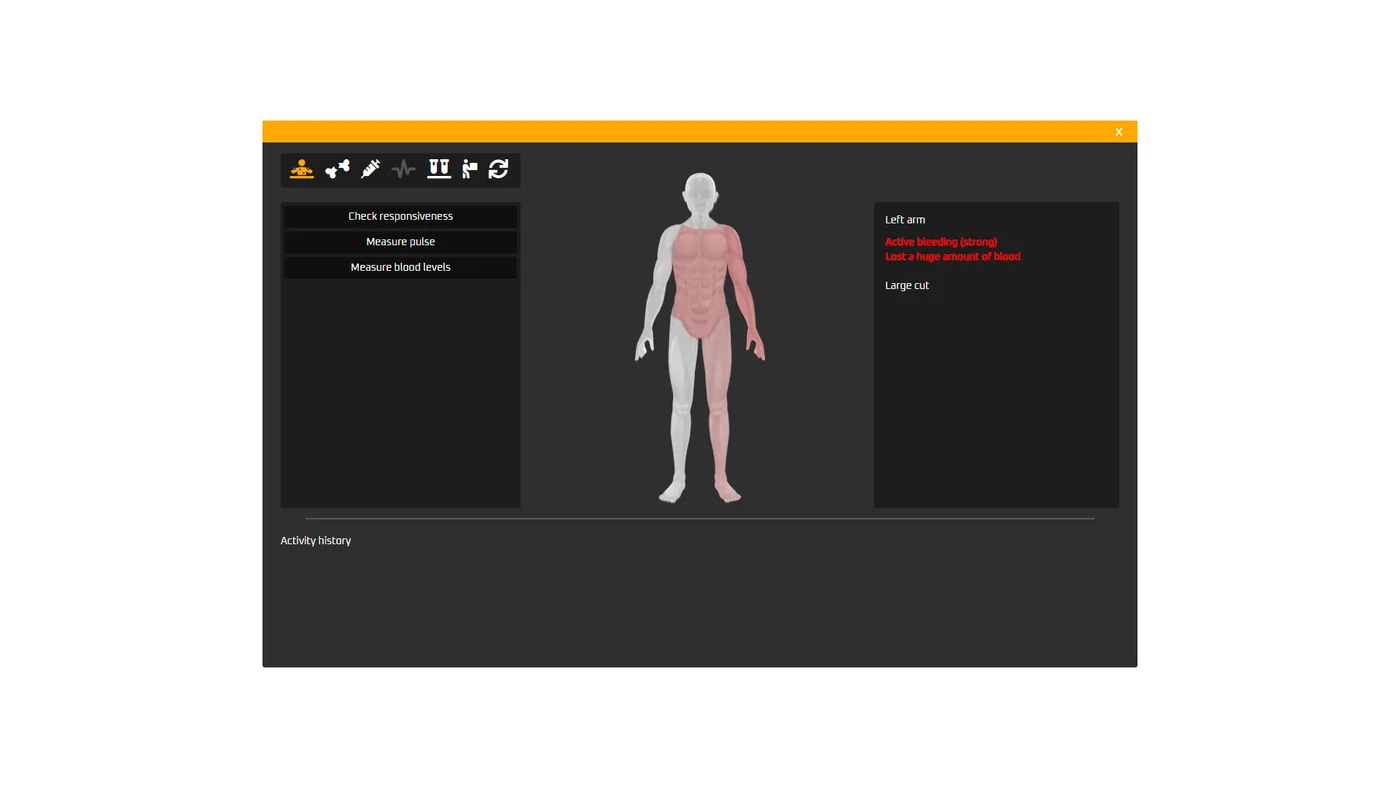
  • The script has 3 types of interface, you can choose which one you like best.
  • Template: new

0UBwMwC.png

  • Template: classic

AwvzKJE.png

  • Template: old

huS3Jet.png

  • The GUI template can be changed easily in Config.lua
  • You can set the position of the Body on the x, y screen the way you like it, if you like it centered, in the corner, higher or lower, place it the way you like it.
  • You can set the size of the GUI ‘scale’, but anything above 1.0 may look weird.
  • The entire interface can be translated easily in the configuration.
  • To access the information from the new and classic interface, it is necessary to press H to enable the focus (mouse) and thus be able to better visualize the information and press the keys.

Commands:

  • There are two commands, /health and /diag
  • /health – Shows your damage taken information.
  • /diag – Shows the damage taken information of the player next to you.
  • These two commands can be changed easily in Config.lua

Resources:

  • GUI information is reset once the player’s maximum health is restored.
  • The body image changes automatically if the ped is male or female.
  • To close the graphical interface, just type the command again or press ESC, DELETE, BACKSPACE or the right mouse button.
  • Indicates various injuries (bruises, gunshots, cuts and punches).

hiy56Vd.png

  • Indicates the cause of death

bzVPjW7.png

  • When eliminating a player, if enabled, the graphical interface will open automatically, showing the damage information of the player you eliminated.

yEBqjKi.gif

  • Upon dying, if enabled, it will have a flash effect on your screen for a few seconds.

t0xepcz.gif

  • When taking damage, if enabled, will have a shake effect on the screen with each damage taken.

EeHyTIw.gif

Database:

  • Now this script has saved player diagnostics.
  • You can disable this function in Config.lua.
  • You can define how many diagnoses each player can have.
  • When exceeding the diagnosis limit, the script will remove the oldest diagnosis from the player and add the new one.
  • This is interesting, because in the medical roleplay, you can have medical files, data from the players in the hospital, for example.

Youtube Video DB

Display Damages:

  • The script has two types of display damages, a GTA own and a custom html.
  • GTA – Using this display, the resmon will be a little high, but it doesn’t affect the FPS.
  • Custom HTML – Using this display, you will have a lower resmon, it doesn’t affect FPS.
  • You can choose what you like best.

Display damages – GTA

  • You can set the color you want, or leave it in RGB mode
  • You can choose some types of display that you want to display on the screen.

H55Yv36.gif

ipdJ8sz.gif

Display damages – Custom HTML

  • You can set the color you want, or leave it in RGB mode
  • You can choose some types of display that you want to display on the screen.

8yps66W.gif

TUj8x8i.gif

  • When eliminating a player/ped, “DEAD” appears on the display, this option can be deactivated in Config.lua

mflZgrj.gif

  • Resmon Display damage – GTA

wXFADH3.gif

  • Resmon Display damages – Custom HTML

XdL6QZP.gif

kwL1XlJ.gif

  • Resmon idle and taking some damage

Vbo6Js9.gif

Reviews (6)

6 reviews for Body Damages V2 [ ESX / QBCore / STANDALONE ]

There are no reviews yet.

Only logged in customers who have purchased this product may leave a review.

How to install

Slap Mods onto Your FiveM Server Like a Pro

Alright, listen up, you want to get those sweet mods onto your FiveM server, right?Tired of the same old boring server and want to spice things up with custom cars, scripts, or maps?Let's get this sorted.Installing mods on FiveM is how you level up your server from basic to banging.It's easier than you think, even if you're not a tech wizard.This guide will walk you through it step by step, no jargon, just straight-up instructions to get your server looking and playing exactly how you want.

Step 1: Snag Your Mod - Find the Goodies

First things first, you need to find the mods you actually want.Think of it like going shopping, but for your server.
  1. Hit up the usual spots: Websites like fivem-mods.net, GTA5-Mods.com are goldmines. Loads of creators post their work there.
  2. Community is key: Don't sleep on forums and Discord servers. You'll find hidden gems and get recommendations from other server owners.
  3. GitHub & Dev Sites: For more unique scripts, check out GitHub or the developers' own websites. Sometimes the best stuff is off the beaten path.
Pro Tip: Double-check the mod is actually gonna work with your server version, especially if you're running frameworks like QBCore or ESX. Compatibility is king.Once you've found your treasure, download the files. They'll usually be in a .zip or .rar file.

Step 2: Server Prep - Get Ready to Rumble

Right, time to get into the server's guts. Don't panic, it's not brain surgery.
  1. Access your server files: You'll need to log into your server's file manager. This is usually through an FTP client like FileZilla or your hosting provider's control panel.
  2. BACK IT UP, fam: Seriously, before you change anything, make a backup of your server files. If you mess something up (and we all do sometimes), you can just restore it and pretend it never happened.
  3. Find the 'resources' folder: This is your mod garage. It's where all the magic happens. Dig around in your server files and locate the resources folder.

Step 3: Mod Installation - Drop It In

Now for the main event - getting that mod live.
  1. Extract the files: If your mod is zipped up, unzip it to a folder on your computer.
  2. Upload to the 'resources' folder: Use your FTP client or file manager to drag and drop (upload) the extracted mod folder into the resources folder on your server.
    • Folder name matters: Make sure the folder name is something you'll recognise later, you'll need it for server config.
  3. Tell your server to load the mod: This is the server.cfg bit.
    • Open your server.cfg file. It’s in the main directory of your server.
    • Add a line like this: ensure [mod_name]
    • Replace [mod_name] with the actual name of your mod folder.
    • Example: If your mod folder is called sick_drift_car, you'd add ensure sick_drift_car.
ensure [mod_name]
ensure my_car_mod

Step 4: Dependencies - The Extras You Might Need

Sometimes, mods are a bit needy and require extra bits and bobs to work. Dependencies, they're called.
  1. Check the mod's info: The mod creator should tell you if there are any dependencies. Read the documentation!
  2. Install dependencies: If there are dependencies, download them and install them in the same resources folder, just like you did with the main mod in Step 3.
  3. Load dependencies too: You'll also need to add ensure [dependency_name] lines in your server.cfg file for each dependency, above the ensure [mod_name] line for your main mod.

Step 5: Server Restart - Fire It Up

Time to reboot and see if it all works.
  1. Restart your server: Use the 'Restart' button in your control panel or restart it manually if you're old school.
  2. Watch the console: Keep an eye on your server console after restart. Any red text or error messages? If so, check the mod's docs or Google the error.

Step 6: In-Game Test - Does It Bang?

Get in the game and see if your mod is doing its thing.
  1. Join your server: Fire up FiveM and connect to your server.
  2. Test it out: Does the mod work as expected? New car there? Script doing its job? Map looking fresh?

Step 7: Troubleshooting - When Things Go Wrong

Sometimes things don't go to plan. Don't sweat it, happens to the best of us.
  • Check file paths: Are your files in the right folders? Double-check everything.
  • Review server logs: Server logs are your friend. They tell you if anything went wrong.
  • Update dependencies: Are your dependencies up to date? Outdated ones can cause issues.
  • Compatibility check again: Is the mod actually compatible with your FiveM version and other mods? Conflicts happen.

FAQs - Your Burning Questions Answered

Q: Where do I find good FiveM mods?
A: Websites like fivem-mods.net and GTA5-Mods.com are great starting points. Community forums and Discord servers are also goldmines.
Q: What's 'server.cfg' and why do I need to mess with it?
A: server.cfg is your server's brain. It tells your server what to load and how to behave. You need to edit it to tell your server to load your new mods.
Q: What if the mod doesn't work after installing?
A: Troubleshooting time! Check file paths, server logs, dependencies, and mod compatibility (as mentioned in Step 7). Google is your friend too!
Q: Do I need to restart my whole server every time I install a mod?
A: Yep, you do. Restarting the server makes it reload all the resources, including your newly installed mod.
Q: Can mods break my server?
A: Potentially, if they're poorly made or incompatible. Always download mods from trusted sources and back up your server before installing anything new.

Final Word - Mod Like a Boss

See? Installing mods on your FiveM server isn't rocket science.It's all about following the steps, being a bit careful, and not being afraid to experiment.Get out there, find some killer mods, and make your FiveM server the envy of everyone. Happy modding!

Mods that will extend Roleplay

  • Money-Back Guarantee: If you're not satisfied, we've got you covered with a no-questions-asked refund policy.
  • Exclusive Content: Our mods and scripts are professionally crafted and exclusive to our platform.
  • Trusted by the Community: Join thousands of FiveM server owners who rely on us for quality resources.
  • High-Quality Design: Built with optimized coding practices for top-tier performance.
  • Seamless Integration: Easily install and run on any FiveM server without compatibility issues.
  • Customizable Options: Adjust settings and features to fit your server's unique style.
  • Optimized Performance: Tested to ensure minimal resource usage and maximum efficiency.
  • Lifetime Updates: Stay ahead with ongoing updates and improvements included at no extra cost.