


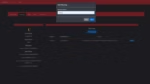

Staff Portal (Web Panel) – Warn, Kick, Ban, Command
$43.99 Ursprünglicher Preis war: $43.99$18.99Aktueller Preis ist: $18.99.
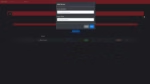
Welcome to the staff portal, this website & resource allows you to punish players even if they’re not in-game! It stores players and their information in a database and lets you warn / kick / ban players from your servers. It supports multiple servers and shares a players list and bans between all your servers.
-
$ USD
-
€ EUR
-
£ GBP
-
$ AUD
-
R$ BRL
-
CHF CHF
-
¥ JPY
-
 Instant Download
 -
Satisfaction Guarantee
-
100% Open Source
-
Works out-of-the-box
This can also be ran standalone on Linux / Windows without a webserver but without SSL. FiveM Staff Panel for administrators for your server!
Features
- Warn players.
- Kick players.
- Temporarily ban players.
- Permanently ban players.
- Commend players.
- Trust Score system.
- Playtime tracker.
- View your profile.
- In-Game commands.
- Logs.
- Easy configuration.
- Easy setup.
- Multi-server support.
- No Lag.
- Discord authentication.
- Dark theme.
- Staff statistics.
- Permissions system.
In-Depth Look
Warn Players
Warning players will instantly show a notification on their screen telling them why they’ve been warned. It doesn’t disrupt them completely, but they couldn’t miss it. This warning then gets put onto their record.
Kick Players
Kicking players will instantly drop them from the server with a message on their screen telling them why they’ve been kicked. They can immediately join back. This kick then gets put onto their record.
Banning Players
Banning players will instantly drop them from the server with a message on their screen telling them why they’ve been banned. They can not join back until the time specified, or they can never join back if the ban is permanent. This ban then gets put onto their record.
Commend Players
Commending players will instantly give them a small message letting them know they’ve been commended, it will also boost their trust score by an amount you can specify in the config of the portal.
Trust Score System
Every player starts with a percentage trust score out of 100% that is configurable in the portal. This trust score goes up based off actions like getting commended and also playtime across all linked servers.
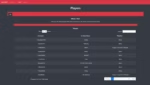
Playtime Tracker
Every player’s playtime is automatically tracked and store by the portal. This effects the player’s trust score and can also be useful to staff when looking for things like cheaters.
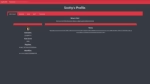
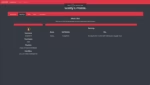
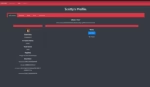
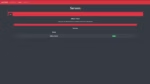
View Your Profile
Every player can check their own profile and their previous punishments if they login to the portal, this stops them having to request their record from staff.
In-Game Commands
Staff members can use commands in-game to punish players to stop them having to open the website for every punishment.
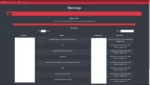
Logs
Logs can be enabled through Discord web hooks that log everything that happens on the portal. This includes all punishments and possible actions.
Easy Configuration
The portal comes with a config JSON file that is easily configured to your needs. The portal also comes with a basic set up guide for anyone that does get stuck. But if the worst comes to worst anyone can always ask for help in Discord.
Easy Setup
The portal is extremely easy to set up, running purely off JavaScript you simply need to run a node process in the background and install the staff resource on all of your servers. You do NOT need to set up your own web server for the portal. It will run on any VPS / Dedicated Server.
Multi-server Support
With multi-server support, you can add an unlimited amount of servers to the portal and all punishments and players will be shared across all of these servers.
No Lag
I’ve used a different approach to other alternatives out there, instead of using RCon we use a different system which results in instant results when punishing players and browsing the portal. This also allows the portal to support up to 1024 players without lag.
Discord Authentication
The portal uses Discord authentication for everything, meaning players will need Discord to join your server, while a steam version is in progress. Discord makes it much easier to assign permissions through roles and manage everyone easily.
Dark Theme
The portal is set up to be as simple as possible for staff, it also uses a dark theme as I got a lot of messages about this when I originally asked for feedback on a light mode version. It’s extremely easy to get used to for a new staff member.
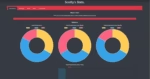
Staff Statistics
Staff will be able to see their own stats, higher staff will also be able to look at all staff’s stats. This can be useful for looking when staff have been active on the portal over a certain time period. Stats will go extremely detailed.
Permissions System
With a custom permissions system, you can customize what every part of the panel each staff member can do.
Only logged in customers who have purchased this product may leave a review.
Slap Mods onto Your FiveM Server Like a Pro
Alright, listen up, you want to get those sweet mods onto your FiveM server, right?Tired of the same old boring server and want to spice things up with custom cars, scripts, or maps?Let's get this sorted.Installing mods on FiveM is how you level up your server from basic to banging.It's easier than you think, even if you're not a tech wizard.This guide will walk you through it step by step, no jargon, just straight-up instructions to get your server looking and playing exactly how you want.Step 1: Snag Your Mod - Find the Goodies
First things first, you need to find the mods you actually want.Think of it like going shopping, but for your server.- Hit up the usual spots: Websites like fivem-mods.net, GTA5-Mods.com are goldmines. Loads of creators post their work there.
- Community is key: Don't sleep on forums and Discord servers. You'll find hidden gems and get recommendations from other server owners.
- GitHub & Dev Sites: For more unique scripts, check out GitHub or the developers' own websites. Sometimes the best stuff is off the beaten path.
.zip or .rar file.Step 2: Server Prep - Get Ready to Rumble
Right, time to get into the server's guts. Don't panic, it's not brain surgery.- Access your server files: You'll need to log into your server's file manager. This is usually through an FTP client like FileZilla or your hosting provider's control panel.
- BACK IT UP, fam: Seriously, before you change anything, make a backup of your server files. If you mess something up (and we all do sometimes), you can just restore it and pretend it never happened.
- Find the 'resources' folder: This is your mod garage. It's where all the magic happens. Dig around in your server files and locate the
resourcesfolder.
Step 3: Mod Installation - Drop It In
Now for the main event - getting that mod live.- Extract the files: If your mod is zipped up, unzip it to a folder on your computer.
- Upload to the 'resources' folder: Use your FTP client or file manager to drag and drop (upload) the extracted mod folder into the
resourcesfolder on your server.- Folder name matters: Make sure the folder name is something you'll recognise later, you'll need it for server config.
- Tell your server to load the mod: This is the server.cfg bit.
- Open your
server.cfgfile. It’s in the main directory of your server. - Add a line like this:
ensure [mod_name] - Replace
[mod_name]with the actual name of your mod folder. - Example: If your mod folder is called
sick_drift_car, you'd addensure sick_drift_car.
- Open your
ensure [mod_name]
ensure my_car_mod
Step 4: Dependencies - The Extras You Might Need
Sometimes, mods are a bit needy and require extra bits and bobs to work. Dependencies, they're called.- Check the mod's info: The mod creator should tell you if there are any dependencies. Read the documentation!
- Install dependencies: If there are dependencies, download them and install them in the same
resourcesfolder, just like you did with the main mod in Step 3. - Load dependencies too: You'll also need to add
ensure [dependency_name]lines in yourserver.cfgfile for each dependency, above theensure [mod_name]line for your main mod.
Step 5: Server Restart - Fire It Up
Time to reboot and see if it all works.- Restart your server: Use the 'Restart' button in your control panel or restart it manually if you're old school.
- Watch the console: Keep an eye on your server console after restart. Any red text or error messages? If so, check the mod's docs or Google the error.
Step 6: In-Game Test - Does It Bang?
Get in the game and see if your mod is doing its thing.- Join your server: Fire up FiveM and connect to your server.
- Test it out: Does the mod work as expected? New car there? Script doing its job? Map looking fresh?
Step 7: Troubleshooting - When Things Go Wrong
Sometimes things don't go to plan. Don't sweat it, happens to the best of us.- Check file paths: Are your files in the right folders? Double-check everything.
- Review server logs: Server logs are your friend. They tell you if anything went wrong.
- Update dependencies: Are your dependencies up to date? Outdated ones can cause issues.
- Compatibility check again: Is the mod actually compatible with your FiveM version and other mods? Conflicts happen.
FAQs - Your Burning Questions Answered
- Q: Where do I find good FiveM mods?
- A: Websites like fivem-mods.net and GTA5-Mods.com are great starting points. Community forums and Discord servers are also goldmines.
- Q: What's 'server.cfg' and why do I need to mess with it?
- A:
server.cfgis your server's brain. It tells your server what to load and how to behave. You need to edit it to tell your server to load your new mods. - Q: What if the mod doesn't work after installing?
- A: Troubleshooting time! Check file paths, server logs, dependencies, and mod compatibility (as mentioned in Step 7). Google is your friend too!
- Q: Do I need to restart my whole server every time I install a mod?
- A: Yep, you do. Restarting the server makes it reload all the resources, including your newly installed mod.
- Q: Can mods break my server?
- A: Potentially, if they're poorly made or incompatible. Always download mods from trusted sources and back up your server before installing anything new.
Final Word - Mod Like a Boss
See? Installing mods on your FiveM server isn't rocket science.It's all about following the steps, being a bit careful, and not being afraid to experiment.Get out there, find some killer mods, and make your FiveM server the envy of everyone. Happy modding!Mods that will extend Roleplay
- Money-Back Guarantee: If you're not satisfied, we've got you covered with a no-questions-asked refund policy.
- Exclusive Content: Our mods and scripts are professionally crafted and exclusive to our platform.
- Trusted by the Community: Join thousands of FiveM server owners who rely on us for quality resources.
- High-Quality Design: Built with optimized coding practices for top-tier performance.
- Seamless Integration: Easily install and run on any FiveM server without compatibility issues.
- Customizable Options: Adjust settings and features to fit your server's unique style.
- Optimized Performance: Tested to ensure minimal resource usage and maximum efficiency.
- Lifetime Updates: Stay ahead with ongoing updates and improvements included at no extra cost.

3 reviews for Staff Portal (Web Panel) – Warn, Kick, Ban, Command
There are no reviews yet.