5 product images available.
Secure Checkout
Cards, Apple Pay, Google Pay, iDEAL/Wero, Bancontact, EPS, Przelewy24, and optional Crypto where available via Stripe.
Requires a FiveM server, esx or qbcore or qbox or standalone, access to server resources, and permission to restart the resource after configuration.
Description
VMS HUD - Advanced Customizable Interface System for FiveM
Revolutionize your player experience with VMS HUD, a fully customizable heads-up display system offering unprecedented control over UI elements. This versatile HUD provides clean, modern interfaces for health, vehicle stats, voice status, and player information while giving each user complete freedom to position, style, and configure their display. Compatible with both ESX and QBCore frameworks, VMS HUD includes intelligent features like pulsating low-status warnings, automatic cache saving, and performance optimization that maintains smooth gameplay even on lower-end systems.
Unlike static HUD systems, VMS HUD empowers players to create personalized interfaces matching their preferences and playstyles. With drag-and-drop positioning using a precision grid system, multiple speedometer types, customizable minimaps, and extensive color options, every player can craft their ideal UI without cluttering their screen or compromising information access.
What's Included
You get a complete HUD system with dual framework support (ESX & QBCore), pma-voice integration, customizable positioning menu accessible via key or command, two speedometer types (linear and circular), two minimap styles (square and circle), seatbelt system with ejection mechanics, fuel display integration, status icons for health/armor/hunger/thirst/stamina, server info display with custom logo support, and comprehensive configuration options. All player preferences automatically save to local cache, preserving custom layouts between sessions.
Key Features
- Universal Framework Compatibility - Works seamlessly with ESX (using esx_status) and QBCore (default food/drink systems). Supports pma-voice for voice indicator integration across both frameworks.
- Customization Menu with Grid System - Players access a comprehensive customization interface via configurable key or command. When repositioning elements, a precision grid appears allowing exact placement. Menu access can be restricted to command-only or disabled entirely via config.
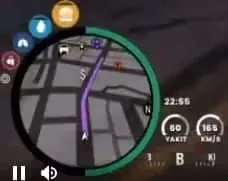
- Dual Speedometer Types - Choose between linear bar speedometer or circular gauge design. Each type supports independent color customization, scale adjustment, and positioning. Players select preferred style through the HUD menu.
- Flexible Minimap Options - Toggle between square and circle minimap styles, both automatically scaling based on user resolution. Default map type is configurable, with selections saved to player cache for persistent preferences.
- Advanced Seatbelt System - Built-in seatbelt mechanics with configurable minimum crash speed threshold and ejection death percentage. If you don't run a separate seatbelt script, this integrated system provides realistic crash consequences.
- Intelligent Status Icons - Health, armor, hunger, thirst, and stamina displayed with customizable positioning (horizontal or vertical layout). Icons pulse when values drop below 20% to alert players. Icons can be completely disabled via menu.
- Center-Screen Protection - Config option prevents players from positioning status icons in the screen center, stopping exploitation where players might use health indicators as aiming crosshairs.
- Server Info Display - Upper right corner HUD shows server identity with toggle between icon/text display. Upload custom server logo (PNG or GIF supported) with editable server name from translation files. Cash and bank balances can be displayed or hidden via config.
- Fuel Integration - Connects to your existing fuel system to display vehicle fuel levels on the speedometer. If no fuel system is installed, fuel display can be completely disabled through config.
- Dual Speed Units - Switch between KMH and MPH measurement systems to match player preferences or regional server settings.
- Local Cache System - All HUD customization choices (colors, positions, types, visibility) save automatically to player browser cache. Settings persist across disconnects and server restarts without database overhead.
- Performance Optimized - Lightweight resource usage with efficient rendering. Minimal impact on frame rates even during intensive gameplay scenarios or high player counts.
- Comprehensive Documentation - Full configuration documentation available at docs.vames-store.com with detailed explanations of every config option and integration guide.
Perfect For
- Servers wanting to give players control over their UI without admin intervention
- Communities with diverse player preferences requiring flexible interface options
- Roleplay servers emphasizing immersion through clean, non-intrusive HUD design
- Racing servers needing clear speedometer visibility with customizable positioning
- Servers running on varied player hardware where UI optimization matters
- Communities migrating from other HUD systems wanting feature parity with better customization
- Developers building custom servers who need reliable, documented HUD framework
Customization Options
- Speedometer: Type (linear/circle), color, scale, position
- Minimap: Style (square/circle), default type on first join
- Status Icons: Layout (horizontal/vertical), position, individual visibility, center-lock toggle
- Server Info: Logo upload, name display, cash/bank visibility
- Seatbelt: Minimum crash speed, death percentage, enable/disable
- Fuel Display: Show/hide based on fuel system presence
- Speed Units: KMH or MPH selection
- Menu Access: Key binding, command-only, or fully disabled
Technical Details
- Framework Support: ESX (esx_status) and QBCore (default systems)
- Voice Integration: pma-voice compatibility for voice indicators
- Resolution Scaling: Automatic minimap adjustment for all screen sizes
- Storage Method: Client-side browser cache (no database queries)
- Resource Impact: Minimal performance footprint with optimized rendering
- Logo Support: PNG and GIF formats for animated server branding
Installation
- Add vms_hud resource to your server resources folder
- Configure framework type (ESX or QBCore) in config.lua
- Set up voice system integration if using pma-voice
- Customize default settings (speed units, menu access, seatbelt parameters)
- Upload custom server logo if desired and configure info display
- Ensure resource in server.cfg and restart server
- Players access customization menu via configured key or command
Framework Compatibility
- ✅ ESX Legacy - Full integration with esx_status for hunger/thirst tracking
- ✅ QBCore - Native support for QB-Core default food/drink trigger events
- ✅ pma-voice - Voice indicator integration for both frameworks
- ✅ Fuel Systems - Compatible with most fuel scripts via config toggle
What Makes It Stand Out
VMS HUD prioritizes player autonomy over rigid developer choices. Instead of forcing a single UI layout on your entire community, it provides tools for individual customization while maintaining consistent functionality. The grid positioning system allows pixel-perfect placement, preventing the frustration of elements being slightly off-target. Local cache storage means zero database overhead for preference saving, while the center-screen protection prevents exploitation without limiting legitimate customization. The dual speedometer types accommodate different aesthetic preferences, from minimalist linear bars to classic circular gauges, with independent styling for each.
Support & Documentation
VMS HUD includes comprehensive support covering installation, configuration, and troubleshooting. Full documentation is available at docs.vames-store.com/assets/vms_hud/ with detailed config file explanations and integration guides for common frameworks and scripts. The support team assists with custom configurations, compatibility questions, and feature implementation.
Why Players Love Customizable HUDs
Every player has different priorities: racers want prominent speedometers, combat players need clear health visibility, and immersion-focused roleplayers prefer minimal UI. Static HUD systems force compromises where some elements are always poorly positioned for certain playstyles. VMS HUD eliminates these compromises by letting players build interfaces matching their specific needs. The cache system remembers their choices, so they configure once and enjoy their personalized HUD permanently. The pulsating low-status warnings ensure critical information gets noticed even with minimalist layouts, while the ability to hide unnecessary elements reduces screen clutter.
https://streamable.com/31cgz8
Related FiveM HUD
Installation notes
Buy this when it saves setup time
Use this checklist to decide quickly whether the resource fits your current server build, framework, and support expectations.
Server-owner payoff
VMS HUD is positioned to reduce HUDs instead of making you rebuild the same system from scratch.
Compatibility
Works with esx, qbcore, qbox, standalone. Check the requirements block before adding it to a live stack.
Purchase confidence
Instant download, Stripe checkout, support access, and refund policy context are shown before payment.
Decision assets
Requirements, Preview video, Product Q&A
Product fit, setup, and proof at a glance
Use the published facts on this page to confirm whether VMS HUD matches your server before checkout.
Compatibility
- Frameworks
- ESX, QBCore, QBOX, Standalone
- Category
- HUDs
Setup & requirements
- Install flow
- Download → resources folder → ensure in server.cfg
- Requirements
- Published on this page
- File size
- 1.22 MB
Proof & buyer questions
- Reviews
- No reviews yet
- Answered Q&A
- Ask before buying
Only the facts published on this page should be treated as confirmed. If you need more detail, review the description, requirements, changelog, reviews, and product Q&A before checkout.